An editable menu
The previous chapters showed how to create your own design and make it editable. This chapter expands on that and shows how to make your site's menu editable as well.
Most navigation menu's look something like this, in HTML:
<nav>
    <ul class="nav">
        <li>
            <a href="/">Home</a>
        </li>
        <li>
            <a href="/page2.html">Page 2</a>
        </li>
    </ul>
</nav>
Using the same trick as in the previous chapter would turn this into:
<nav>
    <ul class="nav">
        <li>
            <a href="/" data-simply-field="menu1">Home</a>
        </li>
        <li>
            <a href="/page2.html" data-simply-field="menu2">Page 2</a>
        </li>
    </ul>
</nav>
This will work, but there is a problem: You can't remove a menu item, or add a new one. You can only change the menu items that are there.
data-simply-list
Instead, we'll use a new trick: data-simply-list.
<nav>
    <ul class="nav" data-simply-list="Main Menu">
        <template>
            <li>
                <a href="/" data-simply-field="item">Menu item</a>
            </li>
        </template>
    </ul>
</nav>
We've added a new attribute and a <template> tag.
The data-simply-list attribute tells SimplyEdit that the contents are a list of things. But SimplyEdit doesn't know what is in these things, unless you tell it. This is where the <template> comes in.
SimplyEdit sees the template tag, and takes its contents and applies it to each element in the list. Just as if each element was a separate page.
Note: a template must contain just one child element, so you may have to wrap the html into a single div. Only the first child of the template is copied into the list.
You can use a data-simply-field inside a list template, just like on any other tag in the page.
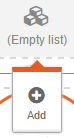
If the list is empty, nothing is shown. Only when you are editing the page, you'll see a message like this in the place of the empty list:

If you click or touch it, a toolbar will appear:
Now press the add button and you will see 'Menu item' appear and the (Empty list) message disappears.
In addition you'll see an icon above and to the left of the new menu item, like this:

It will appear almost transparent until you hover the mouse over the menu item, or touch it. If you press the icon, you get a new toolbar like this:
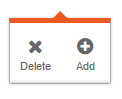
Pressing 'Add' inserts a new menu item, pressing 'Delete' removes it again. You now have a way to create as many menu items as you like, and remove them again later.
data-simply-path
There is one problem though: Each page has its own menu, if you edit the menu on page a, the menu on page b won't be changed. To fix that SimplyEdit has another attribute data-simply-path.
<nav>
    <ul class="nav" data-simply-list="Main Menu"
    data-simply-path="/">
The path is normally automatically retrieved from the URL of the page you are editing. But in the case of the menu, you want the same menu on every page. The data-simply-path makes sure that the main menu is shared by all pages. The content for the Main menu is now always saved to and retrieved from the main page.
If you save the page, the data.json file will contain something like this:
{
    "/" : {
        "Page Title": "Your page title.",
        "Page Body": "<p>Your page contents.</p>",
        "Main Menu": [
            {
                "item": {
                    "href": "/",
                    "contents": "Menu item 1"
                }
            }
            {
                "item": {
                    "href": "/page2.html",
                    "contents": "Menu item 2"
                }
            }
        ]
    }
}
SimplyEdit knows that "Main Menu" is a list. Because of the <template>, it also knows that each element of the list has a field called item and that this field is an anchor tag. So SimplyEdit stores the href attribute and the contents of each item as well.
data-simply-sortable
The final trick is the data-simply-sortable attribute. If you add this attribute to a list, SimplyEdit will allow you to reorder the list using drag and drop.
<nav>
    <ul class="nav" data-simply-list="Main Menu"
    data-simply-path="/" data-simply-sortable>
Start the editor and press-and-hold or touch-and-hold a list item. The item will slant a bit to tell you that it is ready to be moved. Then drag it around and drop it where you want.
The editor is smart about it, it only allows dragging the item in a direction that is useful. So a menu is usually only draggable horizontally, sidebar menu's only vertically. Very rarely its both. SimplyEdit will figure this out itself, you don't need to do anything for this.
linked fields and lists
You can also have the same content, either a field or a list, included in the page more than once. SimplyEdit will make sure that each occurrance is updated when you change any one of them. This way you can, for example, create a fly-out menu for mobile and duplicate the contents in the footer. Whenever you change one, SimplyEdit automatically updates the other. All you need to do is make sure that the field or list names are identical:
<nav class="flyout">
    <ul class="nav" data-simply-list="Main Menu" data-simply-path="/" data-simply-sortable>
        ...
    </ul>
</nav>

...

<footer>
    <ul class="footer-menu" data-simply-list="Main Menu" data-simply-path="/" data-simply-sortable>
        ...
    </ul>
</footer>
You don't even have to use the exact same templates, as long as the names match and any fields inside are identical as well.